Opel GT Forum banner

Code name "STEALTH"

33K views 137 replies 25 participants last post by  wankelgt  
#1 · (Edited by Moderator)
Howdy guys!
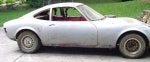
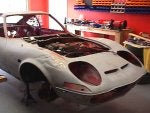
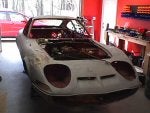
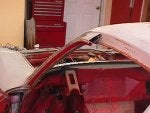
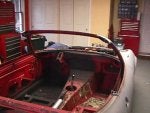
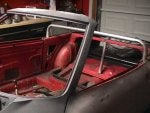
About two weeks ago I got a 1973 Opel GT from another member here in Georgia and started the restoration process. The vehicle is strip down to bare essentials and the conversion process to a convertible will start soon. I have named this project "Stealth" since the vehicle will be painted flat black and most accents will be in red. Of course a flat black GT convertible will stick out like a sore thumb but I kinda like the name.

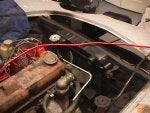
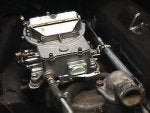
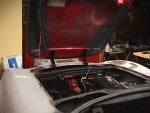
The engine on this vehicle had a bent valve which I took care of and during the repair process, I grooved the chambers as per an article I read here in the forum and information from the Somerden Singh web site. After all, the mod is not that intrusive and I did not see any harm to the head. I also installed a different carburetor using an aluminum interface plate and a phenolic 1/2" spacer, a 45mm single barrel Carter (190Cfm) I had laying around since the Solex was locked up inside.

I was amazed at the end result. The engine idles smoothly from 475 Rpm to 900 Rpm and the reaction time on acceleration is quite superior and almost instant with only the stock mechanical advance. There was no vibration at very low RPM's and even the exhaust smell was totaly different. Water temperature never exceeded 180 degrees on any of the three 15 minute runs. Needless to say, I will be keeping the Opel engine on this build.

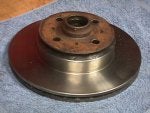
This vehicle will get a few upgrades which I will be posting as the work progresses. The main points will be 4-wheel disk brakes, master cylinder and booster relocation, better (lighter) cooling system, power windows and locks, power convertible top and air conditioning.

The work plan is being developed at this time and work should commence after the final design has been completed.

As always, any and all suggestions will be appreciated.
 
#2 · (Edited by Moderator)
Start of Stealth

Here is a photo of what he is starting from.

I am glad that the engine is running well. I thought it would be a good engine.

I will enjoy watching it becoming a reality!!

P.S. Yes the car was the car I was working on. I have come to the realize that I currently do not have the time to do the job on this car that it needed and blancojp has the time and the ability to do the job correctly. I will be helping him out when I can.
 

Attachments

#3 ·
Thanks Rick for the update, I did not know if you wanted the identity of the previous owner revealed. I have a full set of pictures but as usual, my daughter went back to Boston and took my camera with her.

Now that I am supposed to be on Vacation, I will be working on the vehicle with the help of my gargoyles. Also I want to continue the repairs on your yellow Gt as soon as parts come in.
 
#5 · (Edited by Moderator)
STEALTH - part 1

Howdy All!
Work is progressing quite nicely on the car and should have the first stage done this weekend. I have pictures of the steps taken to perform some of the modifications and will start posting the steps and pictures starting this weekend.

The first stage was to verify the operation of the engine, transmission and rear end. So far there were no problems found, just the vehicle has been sitting for a while and the spider webs are many.

Next part will be reworking the brakes. I will install a brake booster/ master cylinder combination from a '00 Chevy Metro directly on the firewall without the need for the brake bar and outer connecting housing. I use this combination when upgrading brakes on a Ford Falcons where the space is limited. The M/C is slightly larger than the original Opel unit however the increase in diameter will not affect the system's operation. The brake pedal has been modified so we can connect the pedal directly to the booster. The original brake lines were re-routed and modified lengthwise to the new position.

I will post details of this first section this weekend.
 
#6 ·
This sounds like an awesome mod. Keep the info and pics coming!
 
#7 · (Edited by Moderator)
STEALTH - Part 1

Here are a few pictures of the Booster/MC installed in its new position. Notice the brake pedal is retained at the factory position and there is plenty of room for the accel pedal to be installed as well.

The picture also shows the 85 Amp GM alternator installed which will be wired at a later date.

Next step are the front disk brakes. I am debating the rotor size at this time since I can install vented rotors from 248mm up to 330mm and 6 different types of calipers.
 

Attachments

#9 · (Edited by Moderator)
Part - 1

I will be using a different style of coil made by Accel which is a small 3" square block. I have several of them so why not use stock instead of purchasing. The regulator is no longer required since the GM unit is internally regulated however I am installing a small monitoring panel inside the engine bay which will house the coil and two gauges.

Here are a few pics of the body preparation so far. I did mention it was going to be a convertible, right!!!
 

Attachments

#10 · (Edited by Moderator)
Part -1 continued

Well work continues....

I decided to go with 262mm front rotors / Volvo 240DL calipers and 248mm solid rear rotors / Honda calipers for this car. The engine is stock and I believe this combination will increase the braking power a good 75% over the stock scenario with the booster/MC selected.

A word of warning, if you don't have knowledge about braking systems make sure you find someone who does and let them perform all of these modifications. When driving, brakes are your life and you must make sure that you are safe driving your vehicle.

Let us start by removing the old front brakes including the dust shield. First separate the rotors from the hubs by removing the 4 bolts located in the rear of the hub. You will need a serrated bit tool to do this which can be purchased at NAPA for $4.95 each. Once the rotor has been removed then you can start with the fun of making all fit.

Here is the tricky part. The rotors I am using come from a '91 Honda Prelude which have a center hole of 64.5mm. We can either machine the rotor to 72mm matching the hub or machine the back of the hub to 64.5mm matching the rotor. I chose to machine the back of the hub since rotor replacement would not require too much to do if required. Once you can insert the hub into the rotor, using a centering punch mark the first mounting hole on the face of the rotor.

I then drill the 10mm hole and secure the rotor to the hub so there is no movement. Once secured, use the same centering punch and mark the remaining three mounting holes and remove the securing bolt. You can now drill the remaining three 10mm holes and this part is done.

When you install the caliper and rotor assembly on the spindle you will note that you have a 2mm differential in height therefore the caliper will rub against the front face of the rotor. Again, you have two options. You either remove 2mm from the mounting tabs on the caliper or create a 2mm spacer and move the rotor inward. I chose the spacer route since if a caliper requires replacement, you can just install one off the shelf without modification. These are the type of decisions you need to make when upgrading any systems on your vehicle. If you decide to go back to the stock brakes (no clue as to why!!!), just buy a new hub which is not that expensive. I cut the old rotor's hat to create the spacer and machined it down to a 2mm thickness after all, the old rotor was not going to be used and the resulting spacer would have the 4 mounting holes already drilled.

You can now assemble the rotor using the 2mm spacer created from the old rotor and set the unit on the spindle making sure the hub/rotor assembly spins freely and does not have any play.

We are now ready to work on the front caliper and hose requirements.

See pics below.
 

Attachments

#11 · (Edited by Moderator)
STEALTH - Part 1

Hello all!

Well, work continues as allowed since my so called vacation did not last very long. I was able to get ahead and the vehicle is looking pretty good at this time. But first, I would like to thank Rick, Edwin and Gene for their continued help with this project.

With the Volvo front calipers, I used a kit which we sold on eBay for many years. This kit allows you to run a single hose from the firewall to the caliper and the "TEE" is mounted right at the caliper. The hoses used are stainless and are rated at 3Kpsi which should be more than enough. We mounted the front calipers with our kit but had to remove the assembly since out larger wheels have not arrived.

I then started on the rear brakes by removing shoes, cylinder and all hardware associated with the shoes. Did a primary clean up of the area and checked the available clearance to install the bracket at approx. the 2:00 o'clock location. This allows the E-brake cable to come in from the bottom and be as close to stock as possible. For the rear, I decided to use Honda disks and Acura Legend calipers which have the E-brake built in. You can also use Saturn SL1 rear rotors and calipers with the same bracket, it is good to have options.

For now, we had to stop the brakes and work on the body areas since we are now waiting for parts to arrive. The lower supports were installed and the top was cut off. One of my gargoyles suggested we build a California convertible which has an integral roll bar and side supports. Will post the pics as soon as the server lets me, just gives me an error everytime I try to upload.

Until next time.
 
#12 · (Edited by Moderator)
Part -1 continued

Hello All!!

Work has not allowed me time to move forward on this project however, I have done a few things and moved slightly ahead.

1) We are still waiting on parts for the rear system. I made two different style brackets since several members requested something to mount the Cadillac calipers on the rear. This setup uses the same rotors as the front so ending up with 262mm rotors on each corner.

2) The new radiator was installed and the dead (rusted) areas were rebuilt to accommodate this new unit. This is a 4-core unit made specially for this car by our shop which the inlet was relocated to be direct in-line with the thermostat housing.

3) The rear supports were installed and all rear bracing was completed. We installed two additional bars from the rear bumper bar to the top cross bar to further stiffen the rear of the vehicle. This is an old Chevy Nova trick which we use on all high HP cars.

4) The roof came off and the rear profile is starting to take shape. The center roll bar was installed and the rear lights were cut out and the new pattern installed. The rear lights were changed from round to square which blends better with the rear bumpers.

Other than the above, I am still dealing with rust, frozen bolts and other problems which are getting resolved as they appear. But overall I am very happy with the vehicle since no major problems have been encountered so far.

Until next update....
 

Attachments

#13 · (Edited by Moderator)
Stealth - work continues

Hello All!

Well, work continues as allowed since I keep going out of town on short assignments. I was able to get further ahead and the vehicle is looking pretty good at this time and soon it will be time to drop it off to gargoyle land for body work. Bear in mind that all I am doing now is making sure all parts fit and work together after which, all is taken apart during the body work process.

1) Finished the rear panel and set the Mustang lights in place. After minor adjustments, the rear panel was lead filled and protected with black epoxy primer.

2) The hood hinge area is now complete and the hood is now attached to the front assembly. I had to do this three times since I was unaware of hidden rust areas. Also I used an old Mustang battery tray which was welded in to the front support.

3) The intake was mildly ported and an adapter was created to mate the Holley 390Cfm carburator to the Opel intake. I had also to create a new accelerator cable setup since the new booster is larger and covers the accel area.

4) The center roll bar was installed and welded in place. I have several tack welds on top however it is very solid at this time. This should provide minimal roll capabilities since now the complete rear of the body has been reinforced. Several other supports still have to be welded in however I will have to do it when I return next week.

5) The front suspension has been fully checked and no problems were found. I will have to change the rack boots and spring eye bushings when the car returns from the body shop.

Well I guess it is all for now, have not had too much of a chance to make head way but in all, the car will be ready before summer.
 

Attachments

#15 ·
Would like some more information on the tail light modification. What year of Mustang are those from? And what type of bumper is going to be used?
 
#16 · (Edited by Moderator)
Tail lights are from a '65 Mustang which are by far less expensive than a single bucket/lens combination. True you have to redo the back area for the new setup but for me it was cost effective and will look extremely good.

The bumpers will be stock Opel which the mounts were reinforced by the internal roll cage over the gas tank. The car should have limited rear body roll since all flex points are now tied together.

Here are a few additional pics of the rear roll bar and the accel assembly.
 

Attachments

#17 ·
Two questions or notes

How are you going to be able to remove the fuel tank in the future? Also what reinforcements have been made to the rocker areas to prevent sitting in the car and not being able to open the doors when the body flexes-and trust me it will. Just some ideas there-don't ask me how I know
Keith
 
#18 · (Edited by Moderator)
How are you going to be able to remove the fuel tank in the future? Also what reinforcements have been made to the rocker areas to prevent sitting in the car and not being able to open the doors when the body flexes-and trust me it will. Just some ideas there-don't ask me how I know
Keith
Thanks for the comments, it is good to know that a few are watching....

The tank comes out quite well if you remove the center support. The bottom drain plug and supply port are also removed and the tank slides out with minimal effort. There was a bit of trimming done to this tank prior to the clean up specially for this purpose.

As to the rockers, there is a rocker panel insert which had been reinforced with 1/4" plate. The flex is at a minimum at this time and with 200lbs of weight at either the passenger or driver's side seat area, we measured a door gap differential of 0.41mm. My specialty are convertibles and prior to the rocker work, the differential was 3.7mm with just my body weight.

There are still several other supports which will get installed but I need to get the car to the shop and put it on the chassis machine. I can then use the built in laser units for further enhance strength by countering individual stress points. We do this on all of the rods we build due to the extreme HP developed by some of these engines. After all, you just spent $50K on a custom rod and you don't want it to turn into a taco when you hit the gas.

Also, I want this body to be as stiff as possible since there is a possibility I will replace the Opel engine with a 2.4L Zetec engine and a Tremec 5-spd. One of my customers totaled his vehicle and I might just end up with the drive train.
 
#19 · (Edited by Moderator)
Vacation at last

Hello All!

It is true, I am on mandatory vacation for 10 days after working 7 days a week for the past three months.

The car went to gargoyle land this weekend and I will have a massive amount of pictures to post on the body modifications and so on. The drive train will be removed for this operation and all weather and other exposed areas will be treated with bedliner spray instead of undercoating.

The vehicle will undergo the following:

1) A dual sand blasting operation featuring the removal of surface rust covered by the old primer and the second to blend the metal for better adhesion of coating materials.
2) A full coat of Lab Metal sprayed as a first coat primer. I like lab metal because it's water proof and loves to adhere itself to clean metal. It also hardens into a metallic surface when dried which provides additional strength to the body parts.
3) The replacement panels will be installed curing the existing rust problems. All of the body contours and voids created by the cutting of the top will be resolved at this point.
4) The body will be fully sanded and a second coat of Lab Metal will be sprayed on to promote uniform protection to new and existing body panels.
5) The body will be sanded again using the 3/2/1 method and two coats of Glassurrit 2-stage tintable primer will be applied.

Once this is done and the suspension is back on, the vehicle will be placed on the chassis machine to check the stiffness and trueness of the assembly. If the chassis is not stiff enough, additional supports will be installed as required.

Mean time, I will be refinishing the dash pad and wiring the new instrument panel with Dolphin gauges.
 
#22 · (Edited by Moderator)
Work continues

Howdy All!
Well my gargoyles have gone to town on this vehicle, covering every possible angle they can come up with. The have found no major problems so far after the initial sand blast session.

There were a few changes to the original plan:

1) The headlight cutouts were covered with 1/4" balsa and were given a fiberglass upper coat. It was done this way just in case I decide to use the original headlights further down the road. I intend to put my new headlights in place of the two lower marker lights located in the front of the car.

2) The car was sandblasted three times. The first to remove the two coats of primer that were on top of the original paint, the second lighter blast to clean and blend the metal and the third to promote better adhesion of the Lab Metal. Needless to say, it is looking quite good at this time with only three minor pinholes to resolve.

3) The primary bodywork has been completed. The two major imperfections (the passenger side front fender and the driver's side nose section) have been resolved and verified using a contour checker. Now both sides of the frontal body section are the same.

4) Gargoyle #3 wants to blend in the front and rear bumpers to make it look mostly like a vette. Jury still out on this one.

I have a good amount of detail pictures on the process (1.7GB) but they are all high resolution which exceeds the available bandwith.

I will try to post a few this week.
 
#24 ·
2) The car was sandblasted three times. The first to remove the two coats of primer that were on top of the original paint, the second lighter blast to clean and blend the metal and the third to promote better adhesion of the lab metal. Needless to say, it is looking quite good at this time with only three minor pinholes to resolve.
Can I ask for some advice? I had my GT sandblasted down completely to bare metal on a rotisserie (carefully, so as to not to warp the metal, inside and out, top and bottom). I have been busy welding in repair patches and panels (some from donor GT's such the rear wheel arches, most of hand formed 22 gauge sheet metal). I was planning to paint the entire body in self-etching epoxy primer after treating with metal prep. I did the hood and headlight buckets and covers already (which I actually had soda blasted versus sand) and they turned out very nice. I was going to seam-seal (what seams I haven't seam-welded) after the primer and before the paint (not decided on exactly which paint, but probably a dark blue metallic base-clear).

But I have quite a bit of filler to apply to blend in the patches, so the question I have is this. Should I prime first and then apply the filler over the primer, or fill first (to bare metal) and then prime over it all?
 
#27 ·
Convertible top for sale...

FYI - I can't recall what the plan was for the convertible top on this project, but a vendor over on the Solstice forum has a Solstice top for sale for $850 plus shipping.

Matt
 
#28 · (Edited by Moderator)
FYI - I can't recall what the plan was for the convertible top on this project, but a vendor over on the Solstice forum has a Solstice top for sale for $850 plus shipping.

Matt
Thanks for the update but I will be using an Alfa top for this vehicle. I can get them for $300 complete with frame.

On another matter, I got news from gargoyle land on my car. The saga continues as all of the blasting has been completed. The car now has a light coat of Lab Metal applied and now the body work has started. I received a full set of pics for the different stages but the smallest one is 3MB long.

The nose section has been completed and now the work has started on the tail section completing the rear deck. There is also a rear spoiler with a brake light which will also serve to hide the moulding that holds the convertible top rear seal.

They are going all out and a #10 status is what the ultimate goal is.
 
#30 · (Edited by Moderator)
Stealth is taking shape

Howdy All!
I took a trip to Gargoyle land and saw the progress being made on Stealth. I have to say, I like what I saw so far and the car is turning into a masterpiece. The rear deck was setup like a factory assembled car, sections were spot welded together and the rear lines were kept and fully defined.

The nose section was done to perfection to the extent that even though the bucket area was filled, the contour of the buckets still remain. All of the sheet metal repairs have been done and the Lab Metal flows at stage three over the full car. Tinting of the stages allows for differentiation between coats until the last coat tinted black is applied.

Just got to say, my Gargoyles are the coolest dudes around when it comes to cars.

Enjoy!!
 

Attachments

#31 · (Edited by Moderator)
Stealth taking shape - part 2

Just a few additional pictures.......

Lab Metal tinted yellow, stage two preparation. Also shown the initial positioning of the rear spoiler and third brake light.

Car will be awesome when completed.
 

Attachments